¶ File Management System
This User Guide provides detailed instructions on how to use the File Management System in the eTag Fuse Platform. It covers file uploads, metadata management, file synchronization, and navigation within the File Manager interface.
Topics covered:
- Accessing the File Manager
- How To Manage Files
- File Properties
¶ Accessing the File Manager
To access the File Manager, navigate to Fuse > Contents > File Manager. This is the primary interface for adding, viewing, editing, and deleting files across the platform.
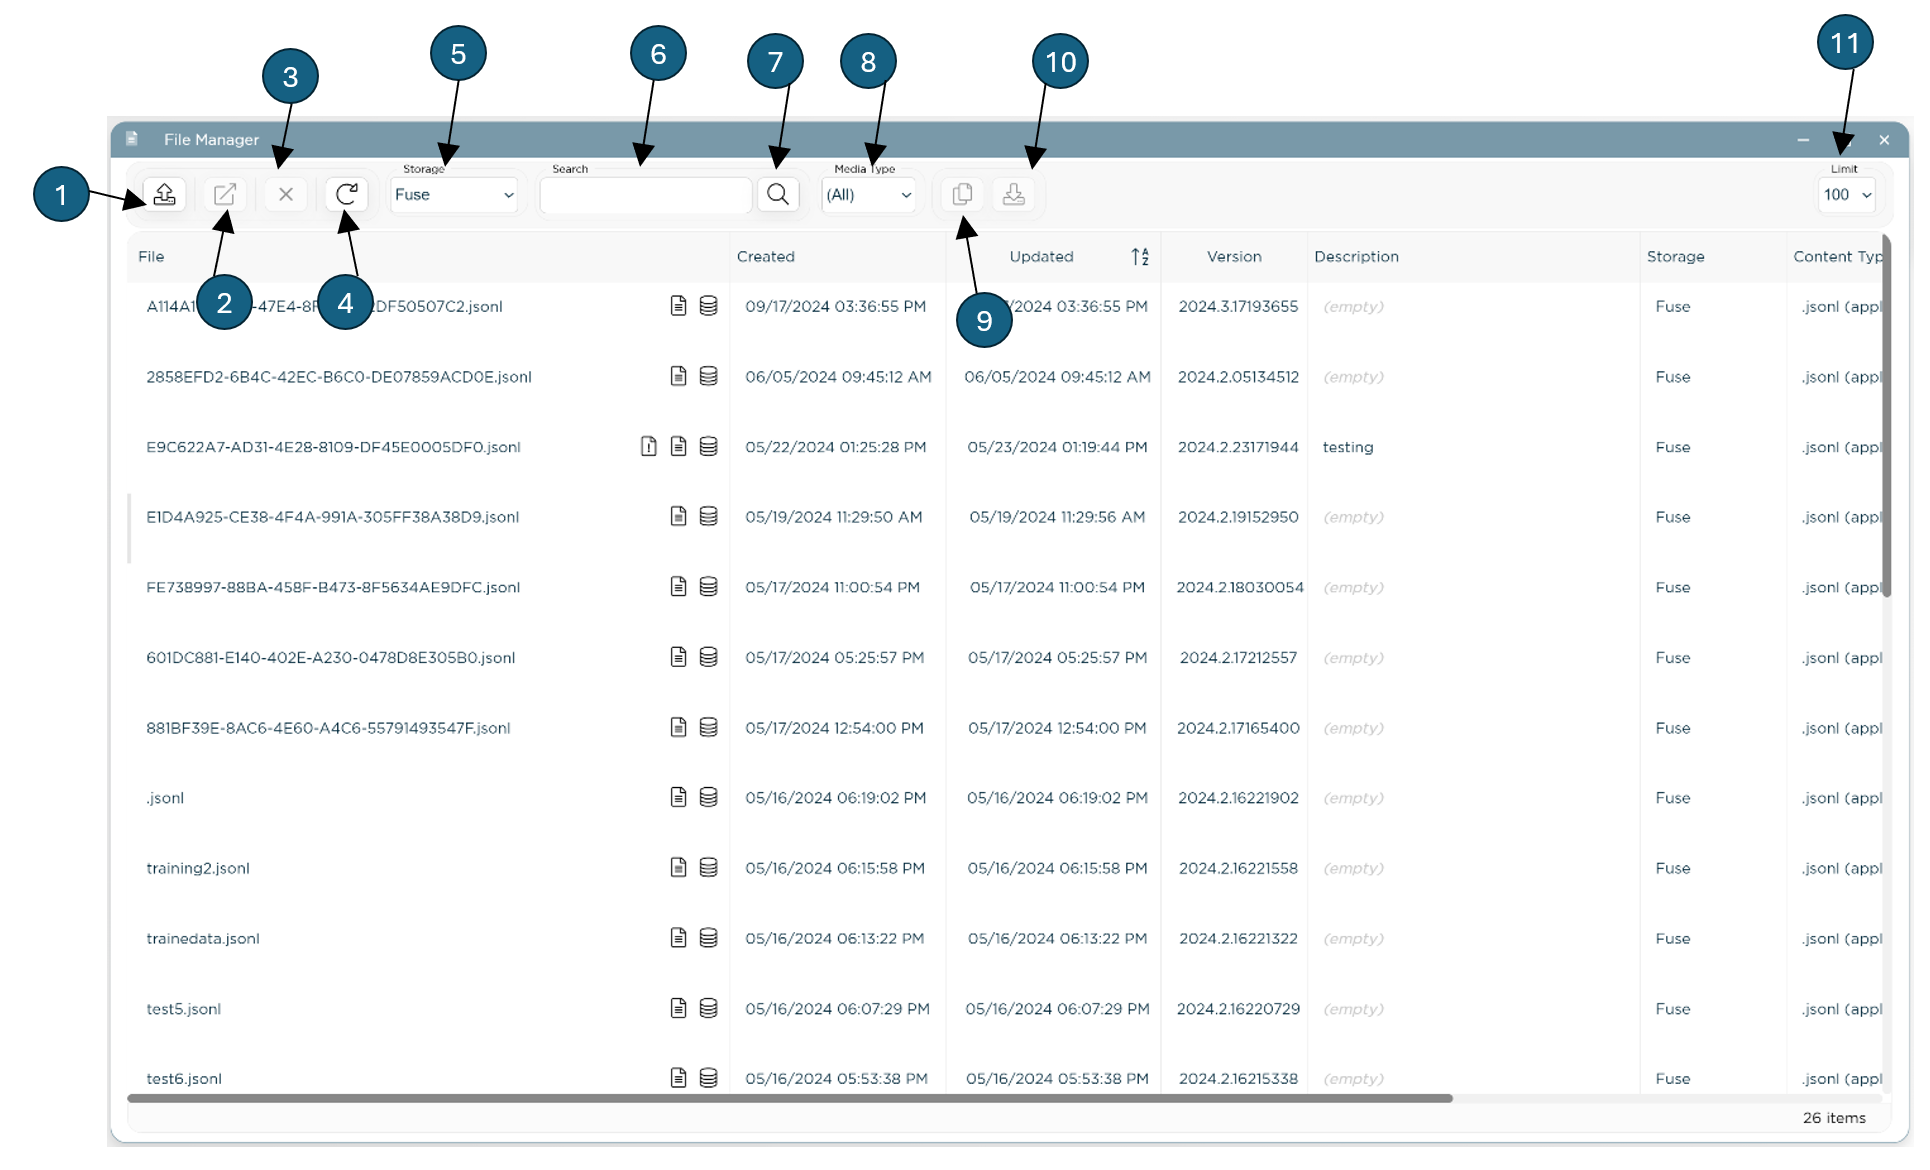
¶ Toolbar
Below is a list of the toolbar functions available for authorized users:
- Upload (1): Uploads a new file to the platform.
- Open (2): Opens the selected file.
- Delete (3): Deletes the selected file. Note: Deleted files cannot be restored.
- Reload (4): Refreshes the file list to reflect the latest updates.
- Storage Filter (5): Use this dropdown to filter files based on storage location or select "All" to view files from all storages (default).
- Search (6): Type a file name in the search box and press "Enter" to search for files.
- Media Type Filter (7): Use this dropdown to filter files based on the type of media or select "All" to view files for all media types (default).
- File Type Filter (8): Use this dropdown to filter files based on storage location or select "All" to view files for all file types (default).
- Copy URL (9): Copies the file’s URL to the clipboard.
- Download (10): Downloads the selected file to your device.
- Limit (11): Limits the number of visible files to the selected value. Default is 100.
¶ Context Menu
Right-click on an item to display the context menu. Below is a list of menu items available for authorized users.
- Upload (1): Click to upload a new file.
- Edit (2): Opens the selected file for editing.
- Delete: Click to delete a selected file.
- Reload: Click to reload the list of files.
¶ How To
¶ Upload a New File
Authorized users may add a new File to the system by selecting the desired storage location and clicking the upload button.
- Select a File Storage Location (5): The file will be stored in the default storage location or the location specified by the administrator.
- Initiate Upload: Click on the Upload button (1) in the toolbar at the top of the File Manager.
- Select File: Using the dialog box that appears, choose the file you wish to upload from your local system.
- Automatic Metadata Capture: Upon upload, the system captures metadata such as file size, MIME type, and content type.
Uploaded files will appear in the file list with relevant metadata displayed in each column.
¶ View or Edit an Existing File
- Open File: Click on the Open button (2) in the toolbar at the top of the File Manager or double-click a file record.
¶ File Manager Properties
The File Manager interface displays file records in a grid or list format.
Data Includes:
- File: The name of the file.
- Created: Date and time when the file was created.
- Updated: Date and time of the most recent update.
- Version: Current version number of the file.
- Description: Optional description of the file.
- Storage: The storage provider or location where the file is saved.
- Content Type: The file’s MIME type (e.g.,
application/pdf,image/png). - URL/Endpoint: A unique URL for retrieving the file using its GUID.
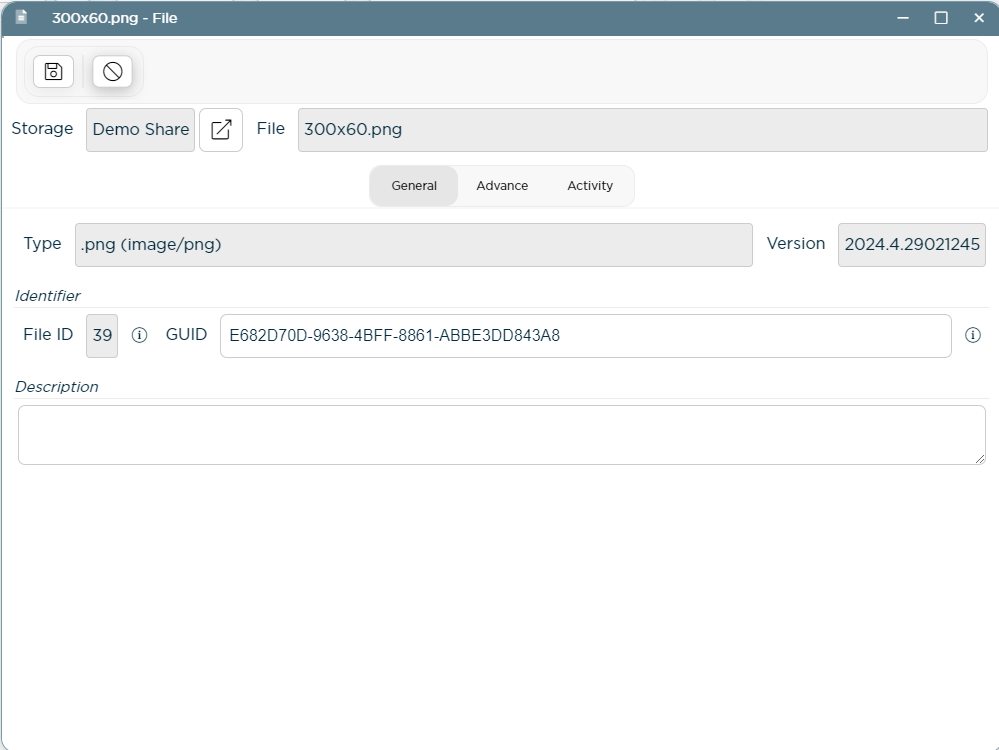
¶ File Properties
To view or edit a file’s properties, double-click on the file or select it and click Open. This opens the file’s detail interface, which includes:
- File Name and Storage: Displays the name of the file and the storage location.
- Identifier:
- File ID: A unique identifier assigned to each file.
- GUID: A globally unique identifier for retrieving the file.
- Description: Add or edit a description for the file.
- Endpoint: A URL for retrieving the file based on its GUID, with buttons to:
- Copy URL to Clipboard
- Open in New Tab
- Download File
¶ File Versioning
Each file includes a version number that updates when changes are made. While there is currently no option for restoring previous versions, versioning allows tracking of file updates.
¶ Synchronization with External Storage Providers
Files uploaded to external storage providers (e.g., Azure Blob, shared directories) follow a synchronization process:
- Temporary Storage: Files are initially stored in the Fuse database and marked for synchronization.
- Synchronization Icon: Files pending or in the process of synchronization display an icon indicating their status.
- Background Synchronization: A background process synchronizes the file with the specified storage provider, after which the synchronization status is cleared.
¶ Managing File Visibility with Inactivation
- Marking as Inactive: To limit a file's visibility, mark it as inactive by selecting the inactive option in the file’s detail interface.
- Effect of Inactivation: Inactive files are hidden from certain interfaces and may be restricted across various Fuse components.
¶ Activity Log for Files
The Activity tab in the file’s detail interface provides a log of actions related to the file, including:
- Upload Events: Records of file uploads.
- Synchronization Events: Logs for synchronization status changes.
- File Creation and Deletion: Entries for file creation and deletion activities.
The activity log is useful for tracking the lifecycle and history of each file.
¶ Filtering Files by Storage
- Using the Storage Filter: In the File Manager, use the dropdown to select a specific storage or choose "All" to display files from all available storages.
- Default View: The default selection is "All," which shows a consolidated list of files across all storages.
¶ Additional Information
For further details about configuring and managing storages, refer to the Storage Management Documentation.
This User Guide provides users and administrators with a complete reference to effectively use the File Management System in the eTag Fuse Platform. For additional assistance, please consult the platform’s support resources or documentation.